Instructions
How to Create Fillable Forms in Word
May
Fillable forms in Word are useful when you want people to type directly into a document instead of printing and writing on it by hand. Microsoft says you can create forms in Word by adding content controls such as text boxes, combo boxes, drop-down lists, date pickers, and check boxes. These controls can be used in templates, forms, and documents.
For most users, the easiest way to create a fillable form is to use the Developer tab in desktop Word. Microsoft’s Word form guidance explains that the Developer tab is where you insert and manage the controls that make the form interactive.
The Short Answer
To create fillable forms in Word:
- turn on the Developer tab
- place your cursor where you want a field
- insert content controls like text boxes, check boxes, or drop-down lists
- edit the control properties if needed
- protect the form if you want users to fill it in without changing the layout
Microsoft says the main controls are added from the Developer tab, and once inserted, they can be customized through Properties.
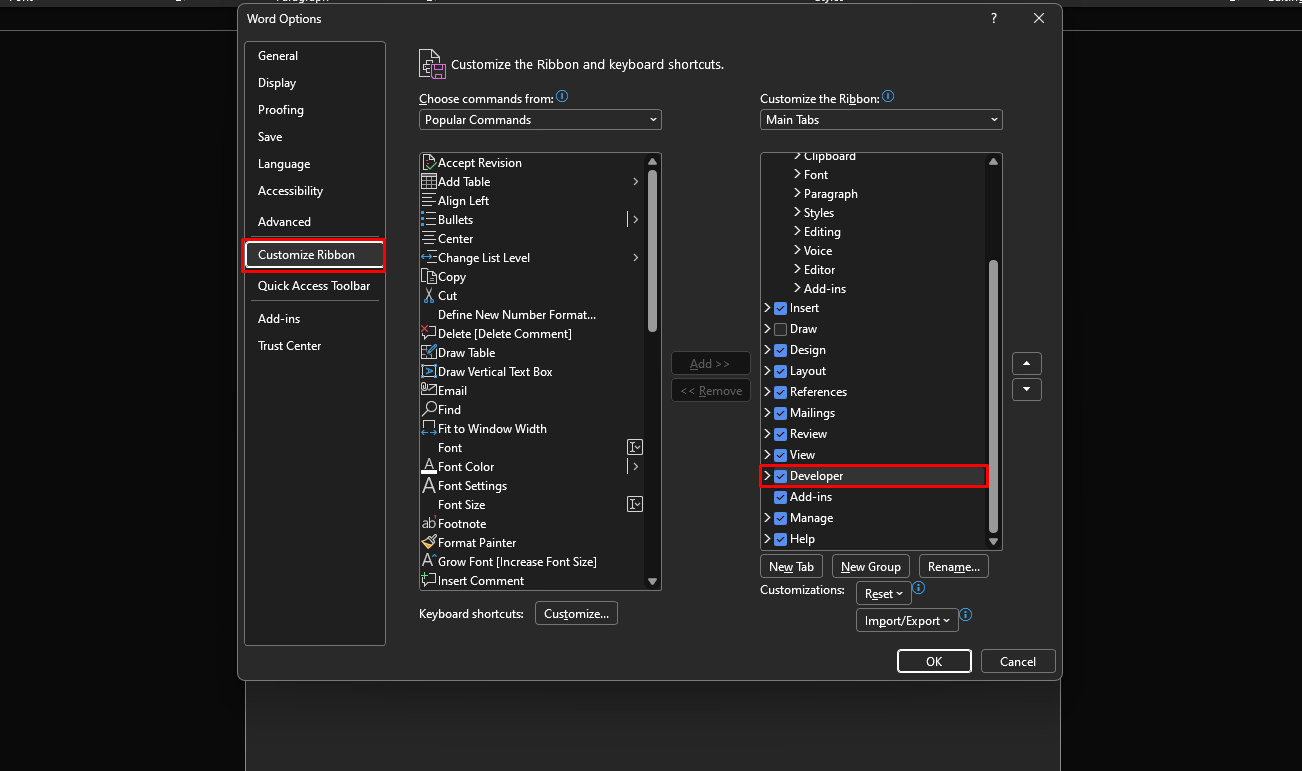
Step 1: Turn On the Developer Tab
If you do not see the Developer tab in Word, you need to enable it first.
Microsoft says to go to File > Options > Customize Ribbon, then under Main Tabs select Developer and choose OK.
This step matters because the controls used for fillable forms are located on that tab.
Step 2: Add Content Controls to the Form
Once the Developer tab is visible, you can start building the form.
Microsoft says the Controls section on the Developer tab contains the tools you use to insert form fields. You can hover over each icon to see what type of control it is.
Common controls you can add
Microsoft’s content-control pages describe several common options:
- Rich Text Content Control for formatted text and multiple paragraphs
- Plain Text Content Control for simpler text entry
- Combo Box Content Control
- Drop-Down List Content Control
- Date Picker Content Control
- Check Box Content Control
These are the main building blocks of a fillable Word form.

Step 3: Add a Text Field in Word
Text fields are usually the first thing people add to a form.
Microsoft says to click where you want to insert the field, then on the Developer tab choose either Rich Text Content Control or Plain Text Content Control. If you want to limit what users can enter, Microsoft specifically recommends the plain text content control.
When to use each one
- use Rich Text if users may need formatting or multiple paragraphs
- use Plain Text if you want a cleaner, simpler response field
Step 4: Add a Drop-Down List or Combo Box
Drop-downs are useful when you want users to choose from a list instead of typing anything they want.
Microsoft says to insert either a Combo Box Content Control or Drop-Down List Content Control, then select the control and click Properties to define the available items.
This is useful for:
- status choices
- department names
- yes or no options
- fixed categories
Step 5: Add a Date Picker
Microsoft says to click where you want the date field, then on the Developer tab click Date Picker Content Control.
This is useful for:
- application forms
- booking forms
- request forms
- contracts and agreements
Step 6: Add Check Boxes
Check boxes are helpful when users need to choose yes/no options or mark selections.
Microsoft says to click where you want the check box, then on the Developer tab choose Check Box Content Control. Microsoft also has a separate support page showing this same checkbox control being used in Word checklists.
This is useful for:
- agreements
- task lists
- option selections
- application forms
Step 7: Edit Control Properties
After inserting a control, you can customize it.
Microsoft says to select the content control itself, then go to Developer > Properties. This is where you can change settings for that control.
Depending on the control, properties can help you:
- rename the control
- lock parts of it
- define drop-down choices
- adjust checkbox behavior
- set formatting rules
Step 8: Add Placeholder or Instructional Text
A good fillable form should tell people what to do.
Microsoft says you can click Design Mode on the Developer tab, select the content control, and edit the placeholder instructional text. Then you turn Design Mode off to keep the instructions saved in the control.
This is very useful if you want to show examples like:
- Enter your full name
- Select a date
- Choose one option
- Type your address here
Step 9: Protect the Form
If you want users to fill in the fields without changing the overall layout, protection is important.
Microsoft’s form guidance explains that you can add protection to a template or form so only certain areas are editable. The same support page also shows grouping and properties options for restricting changes to selected content controls.
In practice, protecting the form helps stop users from:
- deleting labels
- moving text around
- changing the form structure
- editing things outside the intended fillable fields
Why Fillable Forms in Word Are Useful
Fillable Word forms are useful because they turn a normal document into something interactive. Instead of asking users to type freeform text anywhere, you can give them structured fields and options.
This is especially useful for:
- applications
- checklists
- intake forms
- HR forms
- approval forms
- internal business documents
- school or office templates
That use case matches Microsoft’s description of content controls being used in templates, forms, and documents.
FAQ
How do I create a fillable form in Word?
Microsoft says to use the Developer tab and insert content controls like text fields, check boxes, date pickers, and drop-down lists.
Where is the Developer tab in Word?
Microsoft says you can enable it through File > Options > Customize Ribbon, then select Developer under Main Tabs.
What controls can I use in a Word form?
Microsoft’s content-control guidance lists rich text, plain text, combo box, drop-down list, date picker, and check box controls.
Can I make a Word form so users cannot edit the layout?
Yes. Microsoft’s form and template guidance includes protection steps so users can complete fields without changing the rest of the document.
Make document work easier with genuine Office keys, instant delivery, and quick activation that gets Word ready without the wait.